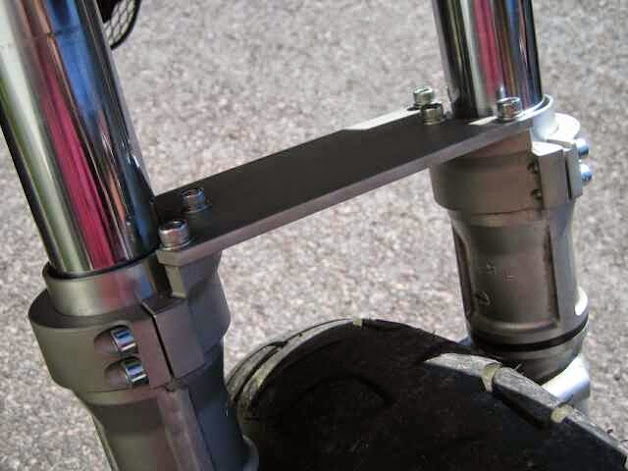
Endlich eine STABILE Telegabel!
Dieser Stabilisator räumt die dem größten Problem unserer DR Telegabeln auf: Der starken Verwindung. Während Federweg und Dämpfung mit Hilfe unserer Federn z.B.… auch bei gröberen Gelände oder härteren Strasseneinsatz noch so manchen Konkurrenten übertreffen, bei jeder Bremsung oder Spurrinne steht das Vorderrad von allein quer! :-(
Unser Gabelstabilisator ist passend für ALLE DR Modelle, auch mit tiefen Kotflügel, und passende Faltenbälge in verschiedenen Farben liefern wir auch!
Lieferumfang
1 Stck. Gabelstabilisator passend zum Telegabeldurchmesser.
Fahrzeuge
Bitte gib uns unbedingt Deine "DR -Daten" im Bestellvorgang mit - dann senden wir den passenden Stabi zu.
Falls jemand noch mehr umbaut... den Stabi haben wir für die 41mm und 43mm Gabel entwickelt.
41mm - DR 600 Dakar, DR 650 SP41-45, DR BIG SR41-42
43mm - DR 350 S/SE (NICHT SHC!), DR 650 SP46, DR BIG SR43
Bei jedem Fahrzeug ist individuell die Freigängigkeit zu prüfen!
Zubehör
Produkt 1035 - Faltenbälge für HRT-Gabelstabilisator - schwarz
Produkt 1092 - Faltenbälge für HRT-Gabelstabilisator - blau
Produkt 1093 - Faltenbälge für HRT-Gabelstabilisator - rot
Technik Tipps
Bei allen Varianten mit hohen Kotflügel beeinträchtigt dieser keineswegs die Schmutzabfuhr im Gelände! Nur die Steifigkeit der Gabel ist, weil sonst ganz ohne Stabi, gefühlt um 1000% gestiegen!
Bei Modellen mit tiefen Koflügel = alle DR BIG, kann der Stabi ÜBER dem Koti montiert werden, ohne dass man diesen verändern muss. UNTER dem tiefen Koti sollte nun das untaugliche Blechdingens entfernt werden. Meist ist dieses sowieso schon krumm, viel wichtiger ist aber, dass dadurch unter dem Koti eine "Schmutzkante" entfernt wurde! Beim Offroadeinsatz können sich Schlamm und kleine Steine dort nicht mehr verfangen- der Effekt ist unglaublich! Trotz tiefen Koti können z.B. Jan und Helmut die gesamten, bekannt schlammigen November OFFROADDAYS problemlos durchfahren!
Bei den DR 650 Modellen mit tiefen Koflügel = SP42/43, wird der Stabi ÜBER dem Koti montiert, allerdings muss dazu der Kotflügel der DR BIG (passt plug and play)verwendet werden. Bei Verwendung des originalen Kotflügels der 650 RS/ RSE muss "geschnippelt" werden, er ist zu bauchig und der Stabi kann sich nicht zwischen diesen Bauch und die Gabelbrücke quetschen, er würde bei vollen Einfedern anschlagen.
Empfehlenswert ist der Stabi -Einbau in jedem Fall auch bei Supermotobereifung! Durch die große Reifenbreite vorn ist das Verziehen der Gabel noch extremer gegeben.
Einbauhinweise
ACHTUNG! Leider hat jedes zusätzliche Bauteil an einem originalen System seine Grenzen: So ist es bei der DR650 SP46 NICHT möglich, den Stabilisator mit hohen Kotflügel zusammen zu verbauen. Bei voller Ausnutzung des Federweges steckt das originale 21" Vorderrad förmlich im Kotflügel. Dort ist einfach kein Platz für die Strebe des Gabelstabilisators! Im Einzelfall muss man diese Aussage auch bei der DR 650 SP41/44/45 überprüfen, grundsätzlich lässt sich das Problem aber mit einem anderen Kotflügel lösen.
Wenn das Motorrad aber auf Supermoto umgerüstet wird, ergibt sich eine andere Konstellation: Durch harte Feder werden die Federwege nicht ausgenutzt, das Vorderrad ist mit 17" kleiner - hier ergeben sich wieder Möglichkeiten, weil keine Kollisionsgefahr besteht.
Ein Gabelstabilisator sollte NIE die Funktion der Gabel beeinträchtigen und muss daher immer absolut spannungsfrei verbaut werden! Gabelholme ausbauen, die Hülsen für die Montage der Faltenbälge oder Neoprenschützer aufstecken. Danach Gabel wieder Montieren. Anschließend die Klemmschellen rechts und links nur locker anschrauben. Dann darauf die Platte aufsetzen und montieren. Jetzt die Klemmschellen ausmitteln und mit MAX 10Nm anziehen. Nun die Gabel mehrfach durchfedern, dabei NICHT die Bremse ziehen. Danach die vorher locker montierte Platte mit MAX 10 Nm festziehen.
Nutze bitte zum sichern ALLER Schrauben Loctite mittelfest 243 oder gleichwertige Gewindesicherung. Solltest Du - was der Stabi nicht verhindert - mal auf die Nase fallen und die Gabel steht krumm, muss ab Punkt "Gabel durchfedern" auch der Stabi wieder ausgerichtet werden.
Zubehör / Tipp
Natürlich bieten wir im DR BIG SHOP passende Faltenbälge zum Gabelstabilisator, sogar in verschiedenen Farben an!
Wenn Du die originalen Faltenbälge weiterhin benutzen möchtest, solltest Du diese - wie im Bild zu sehen - einfach etwas kürzen. Man braucht dazu folgendes Spezialwerkzeug: Mutters Küchenschere... Schneide die Bälge in einer Falte so auf Länge, dass diese genau wie vorher gestreckt sind. Die Befestigung an den Hülsen (dafür sind diese im Stabi) sollte mit Kabelbindern erfolgen. Der begrenzte Platz lässt einen größeren Durchmesser der Hülsen leider nicht zu. Schneide deshalb die Faltenbälge etwas ein, um diese im Durchmesser anzupassen. Wenn Du es richtig gemacht hast - siehts gerade und genauso wie auf unserem Foto aus!
Zulassung
Der Gabelstabi sollte von einem Gutachter abgenommen und eingetragen werden. Für unsere kleinen Stückzahlen können wir aber leider keine ABE für dieses Teil erstellen (lassen). Daher muss der Stabi per Einzeleintragung abgenommen werden. Das können wir gern unterstützen, indem wir einen Fahrzeugschein mit Eintragung als "Muster" bereitstellen. Ob das Dein Prüfer überhaupt will? fragen! ;-)
Nun aber los- stabil die Spur ziehen :-)
Zubehör:
Produkt 1035 - Faltenbälge für HRT-Gabelstabilisator - schwarz
Produkt 1092 - Faltenbälge für HRT-Gabelstabilisator - blau
Produkt 1093 - Faltenbälge für HRT-Gabelstabilisator - rot
HRT FORK BRACE
Finally for a STURDY telescope fork!
This stabilizer eliminates the biggest problem of our DR telescope forks: the strong fork twist. While spring travel and overall damping becomes much better than many forks of competitor bikes (also on rough terrain or hard surfaces) with the help of our spring update in the first step BUT when you have to brake hard or get into a rut the front wheel gets still out of line.
Our fork brace is suitable for ALL DR models, also with low fenders. Additionally, we also supply matching fork boots in different colours on demand!
Content
1 pc fork brace - suitable for the diameter of your telescope fork.
Vehicles
Please inform us about your DR bike details in the order process - then we will send the correct brace.
We offer the brace for 41mm and 43mm forks.
41mm - DR 600 Dakar, DR 650 SP41-45, DR BIG SR41-42
43mm - DR 350 S / SE (NOT SHC!), DR 650 SP46, DR BIG SR43
You must check the freedom of movement individually!
Compatible Products
Product 1035 - Fork Boots for HRT-Fork Brace - black
Product 1092 - Fork Boots for HRT-Fork Brace - blue
Product 1093 - Fork Boots for HRT-Fork Brace - red
Technic Tips
Models with high front fenders: the brace does not affect the self-cleaning of the tyre in mud! But the rigidity of the fork feels better by 1000%!
Models with lower front fender = all DR BIG, the stabilizer can be mounted above the fender, without modification. Remove the metal part inside the fender. Often this is already crooked anyway. But much more important is while off-road use mud and stones cannot get stuck anymore – it´s an incredible effect!
DR 650 models with lower front fender = SP42 / 43, the brace has to be mounted above the fender. However, the fender of the DR BIG (fits plug and play) must be used. When using the genuine fender of the 650 RS / RSE it must be modified. It is too wide and the brace cannot be mounted between the bulge and the fork bridge.
We recommend to use the brace especially when using supermoto rims and tires! Due to the large tire width the warping of the fork is even more extreme.
Installation instructions
ATTENTION! Unfortunately, there are some limits: for example, it is NOT possible to mount the brace in combination with a high front fender on the DR650 SP46. When exploiting the full suspension travel, the original 21" front wheel gets literally in contact with the fender. There is simply no room for the strut of the fork brace! In individual cases it can also be tricky for DR 650 SP41/44/45, but the problem can usually be solved by mounting an alternative fender.
But if the bike is converted to supermoto there is usually no problem. Due to the harder spring, the suspension travel is not totally used, the 17” front wheel is smaller – so there is no risk of collision.
A fork brace should NEVER affect the function of the fork and must be mounted without any tension! Remove fork legs, mount the bushings for the fork boots or neoprene protectors. Then remount the fork to the bike and loosely tighten the screws on the clamps on the right and left. Next assemble the plate of the brace. Now average the clamps and tighten with MAX 10Nm. Now push the fork several times, do NOT pull the brake. Then tighten the pre-fixed plate to finally MAX 10 Nm.
To secure ALL screws please use Loctite 243 or a similar thread lock. If you fall, what the brace cannot prevent, and the fork seems to be crooked than you have to adjust the brace again from the point “push the fork” (see above)
Accessories / Tip
Of course, in the DR BIG SHOP we offer suitable fork boots for the fork brace, even in different colours!
If you still want to use the original fork boots, you should cut them down a bit - as you can see in the picture. You need a special tool: Mother's kitchen scissors... 😉 Cut the fork boots in a fold, stretched as before. Mount them to the bushings with cable ties. Due to the limited space a larger diameter of the bushings is not possible. So make a cut into the fork boots to adapt the diameter. If you did it right - it looks like in the picture above!
Note on approval:
Because of the small quantities we cannot create an approval certificate.
If you want to register the fork brace with a individual approval, we can give you a copy of a German vehicle registration document as base for the notified body.
Compatible Products:
Product 1035 - Fork Boots for HRT-Fork Brace - black
Product 1092 - Fork Boots for HRT-Fork Brace - blue
Product 1093 - Fork Boots for HRT-Fork Brace - red


